Well, I haven't had anyone actually tell me that before, but I've read about it. Some beginner knitter will hear it from some knitting snob who knits differently.
There are actually three styles of knitting, with untold variations between:
Continental: The continental knitter holds the yarn in the left hand, much like a crocheter would and picks up the stitches with the working needle. I can knit this way since I'm a crocheter, but I find it slows me down.
English: The English knitter holds the yarn in the right hand, sometimes sort of wrapping it around the fingers as a crocheter does. They 'throw' the yarn over the working needle to make the stitch.
Combined: The Combined knitter can either be Continental or English. It's the way they make their stitches that distinguishes them. Instead of making the purl stitch by wrapping the yarn over the top of the needle, they wrap it from the bottom. This will twist the stitch, putting the front leg of the stitch (when the work is turned to work back the other way) in the back. To keep the stitch from twisting when it is then worked, the working needle would have to be inserted in the back of the stitch. They say this prevents 'rowing out', making your stockinette stitch and ribbing look smoother.
So what am I? I use the English method of 'throwing' the yarn, but I don't wrap it around my fingers for tension. I simply hold it in my hand, along with the working needle. When I throw the yarn I let the needle go (bracing it with my left hand as I do so), wrap the yarn, grab the needle and complete the stitch. I don't notice any discernible loss of speed doing this (but I've been knitting this way for over 40 years too). If any knitting snob were to come up to me (if I were knitting in public, which I do on occasion) and tell me I was doing it wrong, I would have to then ask them:
"Does this look like (whatever stitch I'm knitting)?" "It does? Then what am I doing wrong?"
I mean, really, just because I don't hold my needles and yarn like you do doesn't mean I'm doing it wrong, it just means I'm doing it differently from you. Get. Over. It.
Monday, December 26, 2011
Sunday, December 25, 2011
Almost there
I've almost perfected the pattern for the fingerless gloves knitted flat. It took several tries to get the stitch count right, but I think I'm almost there. I'll know when I sew the latest glove together.
Mind you, it sort of resembles a misshapen turkey when you're through knitting it, but once you get it sewn together it looks very nice.
Mind you, it sort of resembles a misshapen turkey when you're through knitting it, but once you get it sewn together it looks very nice.
Wednesday, December 21, 2011
Ribbing
Specifically, knitted ribbing.
I don't know why about 99% of the patterns I run across that call for ribbing (socks and hats mostly since I don't do large wearables) call for 2x2 ribbing. To me, 1x1 ribbing looks so much nicer and has more stretch to it.
Therefore, when I run across a pattern I like and it calls for 2x2 ribbing I will change that to 1x1 ribbing.
The fingerless gloves and matching hat I just finished look really nice with it. My grandchildren insisted on modeling them even though they're made for their father. The patterns will be up on my pattern blog later on after I proofread it for mistakes.


Monday, December 19, 2011
Finished one fingerless glove
Well, I think I have the pattern for the two-needle glove nearly tweaked. The prototype looked wonky, even when sewn together and I figured out the problem there. I needed to decrease the number of cast-on stitches from 44 to 42. Then I needed to decrease the number of cast-on stitches for between the fingers from 2 to one. I also had to tweak how I did the thumb.
All in all, the glove still looks a bit wonky (especially with all the long ends hanging off it), until you get it sewn together, then it looks quite nice. And if you seam it carefully, the seams barely show.
Yes, there are about 18 long ends to weave in, but remember, there are 4 fingers and a thumb on each glove and you have to make half of each in the right spot for it to come out right. You would have about half that number of ends if you knitted in the round, and you would only have to hide them and not use them to sew any seams.
This pattern is not for those who like to knit in the round (unless they just want to try it to say they did it), it's for those who are intimidated by knitting in the round, but can knit up a storm on straight needles. You could use a circular needle to knit these, just knit back and forth as if you were using straight needles. It is also not for beginner knitters. I put the difficulty rating at intermediate/hard. I'm not saying a beginner *couldn't* do them, just that they may find it difficult at first.
As I said before, it will look a little wonky when you're finished, but it will look like a fingerless glove when you sew it together. I recommended that you leave long ends when binding off so that they may be used to sew the finger seams and side seams. The loose end from the cast-on can be used to sew up the long side seam of the glove and then hidden. If it isn't long enough, then sew as far as you can and work the end into the glove, then use the end from the pinky to sew down the other part of the side seam.
You could also make a pair of full gloves with this pattern, just leave your ends a lot longer to give yourself plenty of sewing yarn.
Thursday, December 15, 2011
Knitted gloves on two needles
You know, there are countless patterns out there for knitted gloves-both for sale and for free. Most of those patterns call for either one long circular needle for magic loop, two circular needles (used a lot like dpns, but better) or double pointed needles (dpns).
But what about those of us who don't like/are intimidated by knitting in the round, especially socks or gloves? I've seen sock patters for two needles, but very few glove patterns for two needles (though I admit I haven't done a thorough search. But I have a feeling that there aren't very many anyway, either for free or for sale.)
Therefore, I am attempting to knit a pair of fingerless gloves with partial fingers in them for my SiL, whose steering wheel is very cold when the weather is cold, but he likes having the ends of his fingers free. I suspect what I come up with could also be used to make full gloves as well (just keep knitting the fingers till they're long enough.)
My premise is that I can knit the glove in one piece with only one side seam and then the finger seams. We'll see what I come up with. When it goes up, naturally it will be free for personal use/gift-giving. Just credit me for the design if anyone asks where you got the pattern, as a courtesy to my hard work.
Oh, and I do like knitting in the round, but this is for those of you who are intimidated by it or who can do it but just don't like it.
Thursday, December 08, 2011
Four fingers and half a thumb
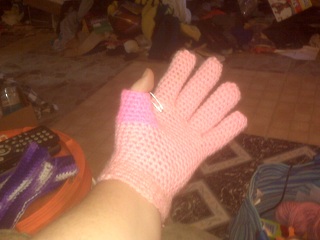
Thumb gussets are a must for a proper fit.
I like having the body of the glove come about an inch below the bottom of the hand.
You will frog, several times, before you get the look and fit that you want.
As I said, thumb gussets are a must, but you can still make ambidextrous gloves and use them, simply put your thumb gusset on one side of the glove and start your little finger on the other side, this way you won't have to worry about which glove goes on which hand, because it don't matter.
Why is the thumb being done in a darker pink? Two reasons. I'm about to run out of the light pink and I wanted you to see what the thumb looked like while it was being constructed. I'll be using the same darker pink in the wrist ribbing as well so that it will balance out. Why am I still working on the glove if I don't have any more of the light pink? It's a practice glove, it wasn't meant to have a mate. And no, I will not be wearing it a la Michael Jackson. It will simply sit as testament that yes, I can crochet a decent-looking glove, with fingers.
Glove in Progress

As you can see from the bad picture (I used my phone and that's my hand so it shows the flash pretty bad), I've gotten two fingers completed. I've started on the middle finger and then I'll just have the index finger and thumb left to do on the main glove. I'm pretty sure there's a pattern out there similar to this one, but, as I said, I couldn't find one using yarn/hooks I already had.
You'll notice there's no ribbing on the wrist. That's because I haven't done any yet. The glove itself comes about an inch below the hand, which, while a bit unplanned, is something I find I like. All those other gloves which have the ribbing come directly to the bottom of the hand before shaping glove I find are a bit uncomfortable anyway.
I plan to use a technique that I found on the web a few years back, which is actually similar to a method I'd developed myself, to attach the ribbing. Essentially, it will be crocheted onto the bottom of the glove and then the two ends crocheted together. I'll be using a hook two sizes smaller than the one I did the glove with to do this with so that the ribbing will be snug.
I will attempt to write out how I did this, but it will still either entail lots of trying on or really good measuring of the hand that the glove will be going on to make this glove.
Wednesday, December 07, 2011
More about my trial (and error) with making my own gloves
I tried one thing and it looked, well, horrible. Kind of like a mutated, five-fingered spider.
So I started all over again from scratch and I think I've found a good formula, but it will still take lots of trial (and error) to get right. It will also require lots of trying on to get the fingers right. So making gifts, unless one is exceptionally skilled, or has hands like the giftee, this won't be the pattern for them.
However, I usually make my patterns for my own use anyway and put it up for others to try if they like.
Gloves
I love crocheting fingerless mitts, as you can see from some of my previous posts. They allow me to keep my hands warm while leaving my fingers free to type, knit or crochet.
However, my husband does not like them. He told me he wants gloves, with fingers in them. I've scoured Crochetpatterncentral and Knittingpatterncentral and while I've saved some patterns to try out later, I wanted to do him some gloves *now*, not have to go to the store and buy yarn and needles (likely I'd have to order the needles anyway).
So I've picked some yellow Simply Soft from my stash and crochet hooks and I am working on something. I'm writing it down as I go and will put it up on my pattern blog as soon as I'm finished. A word of warning-they will not be easy for a beginner, most likely you'll have to be an intermediate crocheter or better to make them.
Tuesday, December 06, 2011
More Ribbed Fingerless Mitts

This is the pattern I have posted on my pattern blog. A friend saw me wearing a pair and asked me where I got them from. When I told her I made them and asked if she wanted some, she gave me some money to get yarn with and the result is two pairs in each of those four colors-Shaded Blues, Shaded Browns, Sandy Print and I can't remember the name of the multi, but it's all fall colors. The yarn is Red Heart Super Saver. She told me she couldn't find anything like them around our area and she only had two pairs that she had found when she was in Colorado. Now she has eight pairs, she can keep what she wants and give the others as gifts, or just keep all of them.
It only takes about an hour of uninterrupted crocheting to make a pair, so they aren't that difficult once you get the pattern down.
Sunday, November 20, 2011
Candy Corn Hat
It's a really cute hat. The pattern can be found here. It would only take a few hours to complete one.
I did make a couple changes. To get gauge I had to use a size H hook and I didn't do any decreases in the last two rnds. Also, when I changed colors, I ended off the old color and attached the new color in a different spot, usually between where I ended off and the next inc. It's about the size of a child's head and I'll get a picture up once I get one of my grandchildren to model it for me.
I'm going to try making one in an adult size as well, so I'm either going to go a couple sizes bigger on the hook (J), or add in another inc in each rnd. I'll let you know.


Sunday, May 08, 2011
Mother's Day gift
That's what I'm calling it. My dad came down from NM to stay with his sister in Wesson for a couple of weeks and brought me a bit tub of yarn that he found that belonged to my mom, who recently passed away. The yarn is in all the colors you can think of and there was also an unfinished afghan in there that I assumed she had started, but come to find out my sister had started it, but the yarn was mom's. Since the pattern is a simple 4 dc shell pattern, changing colors on every row, I decided to finish it. I'm not sure if she had any rhyme or reason for changing colors, but I'm using the most recent color changes as a guide. There's going to be a ton of yarn leftover once I'm done and I'm not sure yet what I'm going to do with it-either another afghan or smaller projects. I'll let you know.
I also found a handwritten pattern she copied from somewhere, along with some printed off the inet and a book of crochet/knit sweaters.
Last, but not least, I found several of her Aero hooks in there. She's been using those hooks ever since I can remember, and I almost cried when I found them, they were the best find in the whole box.
All in all, the best Mother's Day gift.....ever.
Crochet hook conversion chart
Converting the different sizes of crochet hooks.
Metric:         Canada/UK:      USA:            USA:

2.              14              -               0
2.25            13              B               1
2.5             12              -               -
2.75            -               C               2
3.              11              -               -
3.5             9               E               4
3.75            -               F               5
4.              8               G               6
4.5             7               -               7
5.              6               H               8
5.5             5               I               9
6.              4               J               10
6.5             3               K               10.5
7.              2               -                -
8.              0               L               11
9.              00              M               13
10.             000             N               15
Wednesday, February 09, 2011
Calculating a single crochet ripple starting chain
It's actually quite easy, now that I've thought about it. If you don't have a pattern in front of you and you want to crochet a single crochet ripple, then simply figure out how many stitches you want on each side of the peak, add one for the peak and two for the skipped chains at the bottom. This is your multiple. Then crochet this multiple until you have as many peaks as desired, then add three more. This formula will work for any size sc ripple, no matter how many sts you want in each peak.
For instance. Say you want 7 sc along each side. Okay, that's 14. Now you will add 3 more (one for your peak and the two you will skip at the bottom). So that's 14 + 3 = 17. 17 will be your multiple. Now say you want 10 peaks for a wrap. Your starting chain will be 17 x 10 = 170. Now you'll want to add 3 more, bringing your total to 173. So your pattern will read multiple of 17 + 3, meaning you will chain your multiple (17) as many times as you need, then add three more chains at the end.
To crochet this, you will sc in 2nd ch from hook, sk next ch, *sc in next 7 chs, 3 sc in next ch, sc in next 7 chs, sk 2 chs. Repeat from * across to the last 2 chs, sk 1 ch, sc in last ch.
Row 2 and all other rows: Ch 1, turn. Working in the BLO, sc in first sc, sk next sc, *sc in next 7 sc, 3 sc in next sc, sc in next 7 sc, sk 2 sc. Repeat from * across to the last 2 sc, sk next sc, sc in last sc.
That's all there is to it. Use a little math and pre-planning and you can make anything from a scarf to a wrap to an afghan.
Here's some starting multiples for you:
4 sc on sides: Multiple 11 + 3
5 sc on sides: Multiple 13 + 3
6 sc on sides: Multiple 15 + 3
7 sc on sides: Multiple 17 + 3
8 sc on sides: Multiple 19 + 3
9 sc on sides: Multiple 21 + 3
10 sc on sides: Multiple 23 + 3
See the pattern?
Saturday, February 05, 2011
Great chemo cap
The hodgepodge baby hat, when adjusted to adult size and adding in a ribbed headband makes a great chemo cap or just nice warm hat for adults and it doesn't take a lot of time to crochet. I'm not putting this in my original patterns because the hat is someone else's design.
You will need WW yarn such as RHSS, a size K and a size I crochet hooks.
To construct:
Using the larger hook, complete the Hodgepodge hat up to rnd 12 and do not turn. ch 1 and complete rnd 13. Switch to smaller hook and work headband as follows:
Ch 6, sc in 2nd ch from hook and each ch across, sl st in first sc of last rnd of hat, sl st in next sc of hat, turn.
Sk next 2 sl sts, working in BLO (now and throughout), sc in each of the next 5 sc.
Ch 1, turn, sc in each of the next 5 sc, sl st in next 2 sc of hat.
continue as established all the way around hat, then sl st last row of band to free lps of beg ch of band. End off.
Photo will be coming soon.
Wednesday, January 05, 2011
Operation Christmas Child Scarves
I've received some help from some very generous ladies at Crochetville. There is a portion of the site dedicated to charitable crochet, so I put in a word about OCC and several ladies have pledged to send me scarves or hats or leftover yarn. Hopefully this Sunday will have the people of our church being as generous. I know of at least three ladies who crochet besides me and I'm hoping to get them to help make scarves and get the rest of the congregation to donate yarn.
This is what happens when God lays something on your heart. On the flip side, the devil then gets in your way and does things to delay you.
Some simple children's scarf patterns would be:
Materials: WW acrylic yarn such as Red Heart Super Saver and a size K crochet hook. Yarn needle to weave in any ends.
Note: Make scarves about 4-1/2-5 inches wide and between 40-48 inches long. No fringe is needed. Gauge is unimportant.
DC Stripes: Ch 132. Beg in 3rd ch from hook, dc in each ch across. Rows 2-6: ch 2, dc in each dc across. Change color ever row by working half of the last dc in old color and pulling the new color through the last half of st. Or you can simply make this a solid scarf. Leave the ends from the color change dangling for a small fringe if you like and tie them together to secure.
DC Rib: Ch 132. Beg in 3rd ch from hook, dc in each ch across. Rows 2-6: Working in BLO, ch 2, turn, dc in each dc across.
Spiral scarf: Ch 132. Beg in 3rd ch from hook, work 3 dc in each ch and fasten off. Scarf will spiral on its own.
Chevron: Ch 21. Beg in 2nd ch from hook, sc in next 4 ch, 3 sc in next ch, sc in next 4 ch, sk 2 ch, sc in next 4 sc, 3 sc in next ch, sc in last 4 ch. Next and all following rows: Working in the BLO, ch 1, turn, sk 1st sc, sc in next 4 sc, 3 sc in next sc, sc in next 4 sc, sk 2 sc, sc in next 4 sc, 3 sc in next sc, sc in next 3 sc, sk next sc, sc in last sc. Repeat this row until scarf is between 40-48 inches long. It will be about 4-1/2 inches wide. Change colors in the last sc of a row by pulling up a lp in last sc, then pulling the new color through the 2 loops on hook. Cut old color and leave a tail several inches long to work in later. Tie the two yarns together if you wish to secure them.
Monday, January 03, 2011
Operation Christmas Child
What do you do for children who have nothing? Children who are born in poverty in other countries?
Operation Christmas Child
Our church joined this drive several years ago and our donations have steadily increased. This past Christmas we sent off 270 boxes and this year our goal will be 500, almost double.
A funny thing happened in Sunday School this past Sunday. Our teacher handed out bookmarks (His wife oversees this charity). They'll be gathering stuff all year for this and I noticed in March is when they'll be gathering scarves, hats and gloves. I got the idea to start crocheting scarves since it doesn't take long to make a child's scarf, and when I got downstairs after class a lady came up to me and said she was going to bring me some old yarn that evening. I decided I would use that to make the scarves with since I can't afford to buy yarn, and I went to the director and told her about it. She's going to appeal to the congregation next Sunday to donate any scrap yarn that any of the yarn-workers might have (or just donate yarn period if they want to buy some), plus she said she had some in her children's church classroom that I could go through and use. I also just appealed to a crochet BBS for anyone who might want to make a scarf/donate scraps that I would give them my address if they would PM me. I don't know how well that will do, but it never hurts to try, just let God have the reins and see whose heart he touches. Any yarn I receive in this manner will be set aside for this project, even if I don't use it all, I'll have it for the next batch, and the one after that.
Now, I have quite a large number of granny squares to unravel so I can start making scarves.
Saturday, January 01, 2011
Booties and a potholder


I made these yesterday, finished the potholder a few minutes ago. I used Bernat Baby Blanket yarn and the booties are so thick and cushy I think I'll make another pair. The potholder was made from the scraps after I finished the booties. It's simply 20 sc wide and 16 rows. I think I'll do some more of them too, the yarn is thick enough that I don't need to make two and sew them together to get enough protection from hot pot handles. For about $3 to get about 3 potholders (just a guess) isn't bad.
The pattern for the booties can be found in my Pattern Blog.
Subscribe to:
Posts (Atom)