That's the way socks were first knit. Before the invention of dpns or circular needles, knitters had to knit socks on straight needles. I wanted to try this for myself and I found a very easy pattern for doing so. Best thing of all, it was free!
The Easiest Knitted Socks Ever
And it is easy. The author gives the pattern that fits their foot, so you'll have to adjust for your own foot. Any competent knitter can do this easily. However, I did make a couple of other changes.
I made short row heels and toes rather than decreasing/increasing at heel and toe. When they're sewn up they look like short row toes and heels. I also didn't go down as many stitches as she did. I have wide feet and heels, so I only decreased 16 stitches at the toes and heels. I also didn't need as many rows for the bottom of the foot. Only 30 rows. I also added a couple more rows of top ribbing (for 6 rows), which made the top ribbing an even inch in width. As I made changes, I noted them down in notepad in a condensed format since this sock is a plain, stockinette sock.
Here's a couple of in-progress photos of it, so you can see, I'm using straight needles and knitting both socks at the same time. Though I'm only knitting them *almost* flat. Doing it like this and I'll only have to close up the two side seams, since the heels and toes are already done.
The top one is the back of the leg and heels. The bottom one is the bottom of the foot and the toe almost done.
Now, to go this route, you will have to do each heel and each toe separately. I didn't cut my main color when I did the toes and heels since I knew I could just pick it back up for the last purl row of the short rows. All in all, it's been a great knit. I'll post finished pictures when I finish them. I'm already almost finished with the insteps, so I'll just need to knit the front of the leg and the ribbing. I'm toying with a stretchy bind off for that since this sock is basically a top-down/toe up sock. We'll see.
Tuesday, January 10, 2017
Tuesday, September 27, 2016
Freeform
I've been fascinated by this concept for years. I found some pictures of projects that are simply an amalgamation of stitches, motifs and imagination that looked absolutely incredible. Freeform can be knitted or crocheted or both. They start with scrumbles-tiny pieces of knit/crochet stitches. Put them together and/or start adding to it by picking up stitches along an edge and knitting or attaching your yarn somewhere and crocheting. There is no pattern, though you may need templates if your final piece is going to be a garment.
There is no right or wrong to this, you simply use your imagination, yarn and needles or hooks. I'm working on something and it's incorporating knit and crochet. I don't know yet what it is going to be, it hasn't told me yet. But I have lots of tiny amounts of yarn of different weights and looks, along with motifs and pieces of things I've done just to see what they looked like. So, I know it's going to be a large project to incorporate that stuff, but what will it be? Wrap? Afghan? Blanket Shrug? Even I don't know yet. But it seemed like a good idea to put it all together in a showcase of things that otherwise had no use individually.
Sunday, January 24, 2016
Potholders
We need them. The skin of our hands just isn't tough enough to pick up a casserole dish straight out of the oven, or to hold onto a hot iron skillet handle. They're easy enough to make, whether you knit, crochet or sew. You can find any number of patters on the internet, most all of them free. Or you can make one up yourself. Any five to six inch square will do. Just make two of them and sew them together with the right sides facing out. Or crochet them together. As long as it's doubled, single thread squares make better dishcloths. However, don't make them too fancy, unless you're going to use them to decorate your kitchen with. I've found that if the potholder is too pretty I don't want to use it for its intended purpose, which will make it all grimy and greasy, eventually.
I've even come up with a simple pattern myself, called a Pot Grabber. It fits over iron skillet handles so you don't even need a potholder. Also, a Lid Grabber, which fits over hot pan lid handles. I'll have to write them out in my pattern blog, if they're not there. And I don't think they are. I put them on Crochetville a long time ago. Still, they're out there, and only take a short time to make. I don't sell my patterns, if I come up with one. They're usually so simple that giving them away is best. I like to share my work, not sell it.
Still, for plain, utilitarian potholders, one of the easiest, quickest and best ones I've found is the diagonal potholder
However, I do change it a bit. I'll work the first part of the round just like any other, sc down the ch and not worry about loops. There will still be an unworked loop to use for the second part. Also, for a smoother texture, crochet through both loops of the scs. When you go to sew it together, I don't use whipstitch. I'll do the first two loops as if I was going to, but then just move to the next sc on the side the thread came out of. I think this stitch has a name, like box stitch or something? Anyway, only going through the loop on the top as you see it, and moving down the same side as your needle comes out gives a better-looking seam. There's a video somewhere showing this. Yes, here it is Video
The next plain potholder is the waffle stitch, or Helena stitch potholder. It's also called the thermal stitch. It's double thick without holding two strands together as well, which is good. A good picture tutorial is right here Helena stitch potholder
Both of these are great for beginners, though the thermal stitch one can be fussy if you don't count your stitches and make sure you didn't miss an end stitch, as that sucker can hide. Otherwise, they make great plain potholders if you need one in a snap. They make great gifts too. Give them to brides, friends, family. They'll use them all the time. I made my daughter a couple of hotpads over a year ago and she uses them all the time. It's a round motif that I got from my mom and I sat down and figured out how to make it. Yes, you need two of them and you simply crochet them together with wrong sides touching. They're great for hotpads or potholders.
In conclusion, any solid square that you know how to make will make a great potholder. Use two strands held together if you don't want to do any sewing, or make two identical squares and sew/crochet them together.
Also, on another note, the double knitting technique of the Hoover baby blanket could also be adapted to a potholder too.
I've even come up with a simple pattern myself, called a Pot Grabber. It fits over iron skillet handles so you don't even need a potholder. Also, a Lid Grabber, which fits over hot pan lid handles. I'll have to write them out in my pattern blog, if they're not there. And I don't think they are. I put them on Crochetville a long time ago. Still, they're out there, and only take a short time to make. I don't sell my patterns, if I come up with one. They're usually so simple that giving them away is best. I like to share my work, not sell it.
Still, for plain, utilitarian potholders, one of the easiest, quickest and best ones I've found is the diagonal potholder
However, I do change it a bit. I'll work the first part of the round just like any other, sc down the ch and not worry about loops. There will still be an unworked loop to use for the second part. Also, for a smoother texture, crochet through both loops of the scs. When you go to sew it together, I don't use whipstitch. I'll do the first two loops as if I was going to, but then just move to the next sc on the side the thread came out of. I think this stitch has a name, like box stitch or something? Anyway, only going through the loop on the top as you see it, and moving down the same side as your needle comes out gives a better-looking seam. There's a video somewhere showing this. Yes, here it is Video
The next plain potholder is the waffle stitch, or Helena stitch potholder. It's also called the thermal stitch. It's double thick without holding two strands together as well, which is good. A good picture tutorial is right here Helena stitch potholder
Both of these are great for beginners, though the thermal stitch one can be fussy if you don't count your stitches and make sure you didn't miss an end stitch, as that sucker can hide. Otherwise, they make great plain potholders if you need one in a snap. They make great gifts too. Give them to brides, friends, family. They'll use them all the time. I made my daughter a couple of hotpads over a year ago and she uses them all the time. It's a round motif that I got from my mom and I sat down and figured out how to make it. Yes, you need two of them and you simply crochet them together with wrong sides touching. They're great for hotpads or potholders.
In conclusion, any solid square that you know how to make will make a great potholder. Use two strands held together if you don't want to do any sewing, or make two identical squares and sew/crochet them together.
Also, on another note, the double knitting technique of the Hoover baby blanket could also be adapted to a potholder too.
Friday, January 22, 2016
Double knit
Not the yarn weight, actual double knitting. Where you have a double thick fabric. Like in the Hoover baby blanket.
You can actually do smaller projects to get the feel of working any of the variations. A potholder, a doll blanket, or a scarf would all be good. I'm actually working on about a half size blanket for a kitty mat. Also a potholder/dishrag/dishtowel. I think I'll do a potholder in all three versions. I can never find one when I need one, so they won't go to waste and I can use some scrap yarns that I always have around. I also think a scarf would be nice for people who live in areas of very cold winter weather. I'd probably suggest a short one where you sew the two ends together so it slips over the head to avoid dangly ends that will likely unwrap the scarf from the neck. I forget if these types have an official name, but I'd rather wear one like that rather than a long one.
Thursday, January 21, 2016
Why I like circular knitting needles even for straight knitting
It's simple. Circular needles hold more stitches than even fourteen inch straight needles. A twenty four inch circular needle will hold a couple of hundred stitches without dropping them.
Also, the needle ends are shorter, so they don't catch on chair arms or my long sleeves. They're more portable and don't poke through my bag as often as straight needles. They're more comfortable to hold than longer straight needles.
If I want to make socks/slippers in the round, I can use one very long circular needle or two shorter circular needles together, which makes them more convenient than dpns. They're more portable because you can slide the project down onto the cord(s) and it stays there.
So, in my opinion, for any kind of knitting, circular needles are superior to straight needles in every way possible. Others may disagree with me, but that's all right.
Knitting is an art, the knitter is the artist. The yarn is the medium and the needles are the brushes and we make beautiful things. There is no wrong way to knit. There is just each individual who knits in the manner that suits them best.
I have my preferences for crocheting too. I prefer plastic, acrylic or bamboo hooks because they're warmer to hold than aluminum. Yarns, I prefer to use Red Heart or other acrylics, not only because they're cheaper than wool, but because it's washable and dryable. These days, acrylics are much softer than their older counterparts, and some are even as soft as wool. I have nothing against wool and do use it when I can get it or afford it, but I have to use what's available in my area. I don't have a credit card to be able to buy online, not that I have the funds to pay off the credit card, which is why I don't have a credit card.
So don't diss my preferences, just knit or crochet in the way that's most suitable to you and allow me the same courtesy.
Also, the needle ends are shorter, so they don't catch on chair arms or my long sleeves. They're more portable and don't poke through my bag as often as straight needles. They're more comfortable to hold than longer straight needles.
If I want to make socks/slippers in the round, I can use one very long circular needle or two shorter circular needles together, which makes them more convenient than dpns. They're more portable because you can slide the project down onto the cord(s) and it stays there.
So, in my opinion, for any kind of knitting, circular needles are superior to straight needles in every way possible. Others may disagree with me, but that's all right.
Knitting is an art, the knitter is the artist. The yarn is the medium and the needles are the brushes and we make beautiful things. There is no wrong way to knit. There is just each individual who knits in the manner that suits them best.
I have my preferences for crocheting too. I prefer plastic, acrylic or bamboo hooks because they're warmer to hold than aluminum. Yarns, I prefer to use Red Heart or other acrylics, not only because they're cheaper than wool, but because it's washable and dryable. These days, acrylics are much softer than their older counterparts, and some are even as soft as wool. I have nothing against wool and do use it when I can get it or afford it, but I have to use what's available in my area. I don't have a credit card to be able to buy online, not that I have the funds to pay off the credit card, which is why I don't have a credit card.
So don't diss my preferences, just knit or crochet in the way that's most suitable to you and allow me the same courtesy.
Thursday, December 03, 2015
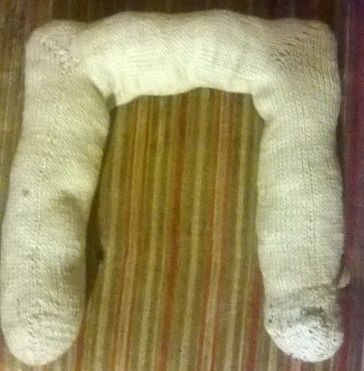
Neck Pillow Finished
It's finished! I said in the previous post that I was working on a neck pillow. And my inspiration was socks. Introducing the knitted Socks Neck Pillow. It works too. I slept really well (when I slept, I have mouth pain right now) It's so soft, squishy and comfortable. It supports my neck, and no matter which way I turn my head, there's support for it. Sleeping flat on my back in a slightly reclined position is now much more comfortable.
I am also working on a crochet version for all you hookers out there too. I hope to have the pattern out on my Ravelry before Christmas. I debated charging a pittance for it, then discarded that idea. My God-given talents are meant to be shared with whomever wishes to share them. I even debated asking for donations, but no, it will be like my three other patterns, completely free.
As you can see, one end looks slightly different from the other. I was using some old yarn and ran out, so I used some other speckled yarn in a slightly lighter off white to finish off the last five rounds and end cap. It was for me, I could care less if it looks all the same or not. It's comfortable and that's the only thing that counts. I only stuffed it just enough to hold its shape, to keep it squishy, I don't like a hard pillow, and I didn't want to put any strain on the corners. It's perfect though, squishy and supportive.
Friday, November 27, 2015
Neck Pillow
You know, those 'U'-shaped pillows that you use when you're traveling. Coincidentally, they're also called travel pillows. Well, I wanted one to sleep with in my bed. See, I can't sleep lying flat anymore. I broke my arm this past Father's Day and if I try to sleep lying flat on my back, that shoulder and arm will complain. Loudly.
So, my darling, loving husband fixed the mattress by placing old sofa cushions under there to raise it up enough so I don't have to sleep in the recliner anymore. But now I can't get my head comfortable. Then I thought about it and came up with a solution. You guessed it, a neck pillow. Since I like to knit and crochet I started looking for a pattern. There is one at Lion Brand that was close to what I needed, but it was too flat-looking. Others looked like dog bones. I didn't want a dog bone to sleep on. So, like always, I started thinking about how to create what I wanted, and the answer just came to me. Socks!
Toe-up socks start off with a provisional cast-on and then you make short rows to form the toe (Well, some of them do.), just like making a short row heel. Problem solved. So, I grabbed up a long circular needle and began knitting. I made a short row 'toe' and I am now knitting up one side of the pillow like it was a big, bulky sock. When I get to where I like how it looks, I'll make another short row 'heel', then make the back of the pillow, another 'heel', then down the other side, where I'll make another 'toe'. Whatever you want to call them, they're all made the same and I believe I'll have a neat little neck/travel pillow when I'm done. Oh, and for convenience sake, it's easier to stuff it as I go with all of those angles that will be in it. And since its construction is identical to socks, I'm calling it the Socks Neck Pillow.
Oh, and I'm translating it to crochet too. Good thing I'm making two of them, the husband will probably want one anyway.
The only way I'll probably finish them both is to work on them alternately. It'll also help alleviate the boredom or working in one stitch all the time. Maybe I'll make up some more decorative ones with different stitches later, I need these fast so sc and knitting around is the fastest.
So, my darling, loving husband fixed the mattress by placing old sofa cushions under there to raise it up enough so I don't have to sleep in the recliner anymore. But now I can't get my head comfortable. Then I thought about it and came up with a solution. You guessed it, a neck pillow. Since I like to knit and crochet I started looking for a pattern. There is one at Lion Brand that was close to what I needed, but it was too flat-looking. Others looked like dog bones. I didn't want a dog bone to sleep on. So, like always, I started thinking about how to create what I wanted, and the answer just came to me. Socks!
Toe-up socks start off with a provisional cast-on and then you make short rows to form the toe (Well, some of them do.), just like making a short row heel. Problem solved. So, I grabbed up a long circular needle and began knitting. I made a short row 'toe' and I am now knitting up one side of the pillow like it was a big, bulky sock. When I get to where I like how it looks, I'll make another short row 'heel', then make the back of the pillow, another 'heel', then down the other side, where I'll make another 'toe'. Whatever you want to call them, they're all made the same and I believe I'll have a neat little neck/travel pillow when I'm done. Oh, and for convenience sake, it's easier to stuff it as I go with all of those angles that will be in it. And since its construction is identical to socks, I'm calling it the Socks Neck Pillow.
Oh, and I'm translating it to crochet too. Good thing I'm making two of them, the husband will probably want one anyway.
The only way I'll probably finish them both is to work on them alternately. It'll also help alleviate the boredom or working in one stitch all the time. Maybe I'll make up some more decorative ones with different stitches later, I need these fast so sc and knitting around is the fastest.
Labels:
circular knitting,
crochet,
musings,
neck pillow,
pattern,
short rows,
socks
Thursday, February 05, 2015
Hoods/Scoodies
Okay, a hooded scarf is called a Scoodie, I can understand that. But what if you only wanted a hood without the scarf attached? I suppose you could make one with ties on it, sort of like a bonnet, but I had an idea to make a neckwarmer with a hood attached. Then what would it be? I pondered this for a few minutes and came up with:
Nhood.
Why even consider something like this? Well, I really don't like dangly scarf ends and I wanted something that would look nice and be practical.
A neckwarmer is basically a circular band that you wear around your neck in lieu of a scarf. So why not attach a hood to it and end the need to wear a separate hat?
So I've gotten out my knitting needles and crochet hook and am in the process of designing a knitted and a crocheted version for all my knitting and crochet friends out there. The patterns will be posted to my Ravelry as soon as I've completed them.
Nhood.
Why even consider something like this? Well, I really don't like dangly scarf ends and I wanted something that would look nice and be practical.
A neckwarmer is basically a circular band that you wear around your neck in lieu of a scarf. So why not attach a hood to it and end the need to wear a separate hat?
So I've gotten out my knitting needles and crochet hook and am in the process of designing a knitted and a crocheted version for all my knitting and crochet friends out there. The patterns will be posted to my Ravelry as soon as I've completed them.
Friday, January 23, 2015
Bubbles Baby Blanket
I'm pretty sure I've spoken about it before, or even shown off a finished one. But I had an idea, and it's turning into a very pretty one.
Just take the Bubbles Baby Blanket pattern and two colors of WW yarn. A dark and light yarn will work best for this. Now, using about a J or K hook (I'm using a 7mm bamboo hook) and your MC, crochet a chain the length you want your afghan to be. Just make sure that your stitch count is a multiple of three, plus two (This means crochet a ch with a multiple of three, then add two more chs at the end). Now, work across the chain like the instructions say, only change to your CC in the last stitch. Do this by making the last half of the sc with your CC. Now, leaving about four or five inches, cut MC and tie the two ends, along with the tail from your starting ch, together in an overhand knot and push it up close to your work. After this, just tie the MC and CC together when you change color.
That's it! Just swap colors on each row, and soon you'll see that you'll have a double-sided blanket. Your yarn ends become the top and bottom fringe rather than you having to work them all in. Normally, I don't like fringe, but I hate working yarn ends in even more, so this is me being lazy. But it looks good in the one I'm doing. I will post a pic when I'm done. I've only just started, but it still works up fast.
Just take the Bubbles Baby Blanket pattern and two colors of WW yarn. A dark and light yarn will work best for this. Now, using about a J or K hook (I'm using a 7mm bamboo hook) and your MC, crochet a chain the length you want your afghan to be. Just make sure that your stitch count is a multiple of three, plus two (This means crochet a ch with a multiple of three, then add two more chs at the end). Now, work across the chain like the instructions say, only change to your CC in the last stitch. Do this by making the last half of the sc with your CC. Now, leaving about four or five inches, cut MC and tie the two ends, along with the tail from your starting ch, together in an overhand knot and push it up close to your work. After this, just tie the MC and CC together when you change color.
That's it! Just swap colors on each row, and soon you'll see that you'll have a double-sided blanket. Your yarn ends become the top and bottom fringe rather than you having to work them all in. Normally, I don't like fringe, but I hate working yarn ends in even more, so this is me being lazy. But it looks good in the one I'm doing. I will post a pic when I'm done. I've only just started, but it still works up fast.
Thursday, January 15, 2015
Headbands
I appear to be on a headband kick. No, not those skinny things that do little to hold hair back, but thicker ones that keep your head and ears warm on chilly days. They work almost as well as a hat.
I've designed one in knit that I've put up on my Ravelry page. I only have three original designs there, though I've been thinking about taking my designs from my Original Designs blog and put them there as well. I'd have to convert them to PDF, but that isn't a problem. Open Office Writer has a PDF converter. All I would need to do is c/p from my page to OO, then convert. Putting them up on Ravelry is a bigger undertaking, but once there they will be out there better for people to use and enjoy.
Back to headbands. Along with the Textured Headband, I'm almost through designing another one. And yes, it will go up on Ravelry as a free download. I like to share my ideas with everyone else, not make money from them. It's a hobby for me, not a business, which keeps it fun.
I doubt you'll see any large articles coming from my head to pattern, I prefer small things like hats, headbands, handwarmers, etc.
Anyway, stay tuned for more headbands.
I've designed one in knit that I've put up on my Ravelry page. I only have three original designs there, though I've been thinking about taking my designs from my Original Designs blog and put them there as well. I'd have to convert them to PDF, but that isn't a problem. Open Office Writer has a PDF converter. All I would need to do is c/p from my page to OO, then convert. Putting them up on Ravelry is a bigger undertaking, but once there they will be out there better for people to use and enjoy.
Back to headbands. Along with the Textured Headband, I'm almost through designing another one. And yes, it will go up on Ravelry as a free download. I like to share my ideas with everyone else, not make money from them. It's a hobby for me, not a business, which keeps it fun.
I doubt you'll see any large articles coming from my head to pattern, I prefer small things like hats, headbands, handwarmers, etc.
Anyway, stay tuned for more headbands.
Tuesday, January 13, 2015
Amazing socks
Lion Brand Amazing yarn is just...amazing. They say it's a 4 weight, but it's really a bit thick and thin and not quite as thick as a WW. It's 53% wool and 47% acrylic, but it's really soft and squishy and fuzzy.
I'm making a pair of socks out of a ball using size 3 dpns. I'm just using a basic SS pattern and am on the leg portion right now, but I can already tell that they're going to be warm and cozy. The color I'm using is called Cobblestone. It's stripes of browns and tans that look really nice. Here's a shot of the leg of the sock:
Beautiful, isn't it?
I know Amazing isn't sock yarn, but I just couldn't help myself. When I got it, all I could think of was "Socks, socks, socks..."
Yes, I have 1x1 ribbing. I like it better than 2x2. I'll put up more pictures when the sock is farther along.
I'm making a pair of socks out of a ball using size 3 dpns. I'm just using a basic SS pattern and am on the leg portion right now, but I can already tell that they're going to be warm and cozy. The color I'm using is called Cobblestone. It's stripes of browns and tans that look really nice. Here's a shot of the leg of the sock:
Beautiful, isn't it?
I know Amazing isn't sock yarn, but I just couldn't help myself. When I got it, all I could think of was "Socks, socks, socks..."
Yes, I have 1x1 ribbing. I like it better than 2x2. I'll put up more pictures when the sock is farther along.
Monday, January 12, 2015
Prayer Shawl
I started knitting one. Well, I don't pray aloud while working on it, don't light candles or recite some fixed mantra, but I'm using a pattern I found on a website dedicated to prayer shawls. Really, any shawl can be a prayer shawl if you're making it for someone who needs some comforting. Just pray silently as you work on it that it brings the comfort intended.
I do pray, talk to God while I knit. Usually silently. He's omnipotent, he knows I'm talking to him even when my lips don't move. Do I always get answers? No. But that in itself is an answer. I'm being told to wait. Non-answers aren't always negative.
Anyway, back to the shawl. It's an interesting and simple pattern. Simply cast on a multiple of three (I CO 60). Then work in k 3, p 3. On following rows you simply knit the purl stitches and purl the knit stitches. The pattern emphasizes that it should not look like ribbing. What it does look like is columns of garter stitch. I find it a refreshing change from normal garter stitch, which is knitting every single stitch in every row until you have a shawl. Now, tell me you won't get bored to tears doing that and put it down very often and possibly not finish it, knowing how boring it is to knit. However, this is very refreshing. You're knitting and purling and still getting garter stitch and it isn't nearly as boringly repetitive as knit, knit, knit, knit, knit...well, you get the idea.
I'm also using a method called combined knitting, where you make your purls 'backwards' and then orient them correctly in the next row by working the backwards stitch through the back loop. This also keeps things less boring. It also tells me which stitches I need to purl. The 'backwards' stitches are the ones that need to be purled, so they get purled through the back loop to orient them correctly.
I don't even know what the pattern itself is called, the site just calls it a prayer shawl and then gives the instructions. I think I read something about it being compared to vertical blinds, and that's a pretty close description. So, I think that's what I'd call it. Vertical Blinds. Or more simply, 3x3 Garter.
I'm also using the pattern on some legwarmers I'm attempting. I'm knitting them flat and will seam them when done. It's the same pattern, but will have 1x1 ribbing on each end. I'm just using some recycled light pink yarn I pulled from an old afghan that was coming apart. It's RHSS, acrylic, so will be washable. I ended up with two big balls of it and didn't know what to do, so it's now becoming a shawl and legwarmers.
Hey, the yarn is still in decent shape, might as well re-use it rather than throw the afghan out.
I do pray, talk to God while I knit. Usually silently. He's omnipotent, he knows I'm talking to him even when my lips don't move. Do I always get answers? No. But that in itself is an answer. I'm being told to wait. Non-answers aren't always negative.
Anyway, back to the shawl. It's an interesting and simple pattern. Simply cast on a multiple of three (I CO 60). Then work in k 3, p 3. On following rows you simply knit the purl stitches and purl the knit stitches. The pattern emphasizes that it should not look like ribbing. What it does look like is columns of garter stitch. I find it a refreshing change from normal garter stitch, which is knitting every single stitch in every row until you have a shawl. Now, tell me you won't get bored to tears doing that and put it down very often and possibly not finish it, knowing how boring it is to knit. However, this is very refreshing. You're knitting and purling and still getting garter stitch and it isn't nearly as boringly repetitive as knit, knit, knit, knit, knit...well, you get the idea.
I'm also using a method called combined knitting, where you make your purls 'backwards' and then orient them correctly in the next row by working the backwards stitch through the back loop. This also keeps things less boring. It also tells me which stitches I need to purl. The 'backwards' stitches are the ones that need to be purled, so they get purled through the back loop to orient them correctly.
I don't even know what the pattern itself is called, the site just calls it a prayer shawl and then gives the instructions. I think I read something about it being compared to vertical blinds, and that's a pretty close description. So, I think that's what I'd call it. Vertical Blinds. Or more simply, 3x3 Garter.
I'm also using the pattern on some legwarmers I'm attempting. I'm knitting them flat and will seam them when done. It's the same pattern, but will have 1x1 ribbing on each end. I'm just using some recycled light pink yarn I pulled from an old afghan that was coming apart. It's RHSS, acrylic, so will be washable. I ended up with two big balls of it and didn't know what to do, so it's now becoming a shawl and legwarmers.
Hey, the yarn is still in decent shape, might as well re-use it rather than throw the afghan out.
Saturday, January 10, 2015
My switch to continental knitting
It's been awhile since I wrote that I was switching to continental style knitting. You know, where you hold your working yarn in your left hand like a crocheter does. Since I've been a crocheter as long as I've been a knitter I decided to try it. See, the knitter who taught me knitted English style, and she simply held the yarn in her right hand and threw it around the needle to make the stitch. So, that's how I knitted for most of my life.
Then I decided "Well, I already hold my yarn like that for crocheting, how hard can it be to hold it like that while knitting and pick up the stitches?" Turns out it was a bit awkward-feeling at first, until I found a rhythm that suited me. Now I'm knitting quite smoothly. I can't say that my gauge is quite consistent, but I never make things where gauge is so crucial that being off just a little would be a disaster.
I've also just started trying the combined method of knitting. This is where you make your purl stitches 'backwards' by wrapping the yarn in the opposite direction of how you're taught when you make it. This leaves the stitch backwards in the following row, so you work the stitch through its back leg to orient it correctly when you slide it off the needle.
On a funny aside note: I can just see myself knitting like this in a public place and having some random knitter walk up to me and tell me "You're doing that wrong!" To which I can just shrug and say "Just because my style doesn't match your style doesn't mean it's wrong, it just means it's different."
Or ask where the knitter's book of laws is so I can read it and not get arrested for 'doing something wrong'. And then point them to the many sites which describe combined knitting ;)
Laughable, isn't it? But it happens. I haven't had the displeasure, but I've read enough about other knitters or crocheters being accosted by these 'snobs' to know it happens.
I'm not sure if anyone even reads my ramblings due to no comments, but that's okay. I just like to ramble, and if it means rambling to myself, then I'll ramble to myself.
Then I decided "Well, I already hold my yarn like that for crocheting, how hard can it be to hold it like that while knitting and pick up the stitches?" Turns out it was a bit awkward-feeling at first, until I found a rhythm that suited me. Now I'm knitting quite smoothly. I can't say that my gauge is quite consistent, but I never make things where gauge is so crucial that being off just a little would be a disaster.
I've also just started trying the combined method of knitting. This is where you make your purl stitches 'backwards' by wrapping the yarn in the opposite direction of how you're taught when you make it. This leaves the stitch backwards in the following row, so you work the stitch through its back leg to orient it correctly when you slide it off the needle.
On a funny aside note: I can just see myself knitting like this in a public place and having some random knitter walk up to me and tell me "You're doing that wrong!" To which I can just shrug and say "Just because my style doesn't match your style doesn't mean it's wrong, it just means it's different."
Or ask where the knitter's book of laws is so I can read it and not get arrested for 'doing something wrong'. And then point them to the many sites which describe combined knitting ;)
Laughable, isn't it? But it happens. I haven't had the displeasure, but I've read enough about other knitters or crocheters being accosted by these 'snobs' to know it happens.
I'm not sure if anyone even reads my ramblings due to no comments, but that's okay. I just like to ramble, and if it means rambling to myself, then I'll ramble to myself.
Saturday, September 27, 2014
Speed Knitting/Crocheting
This I am not. But there are some out there who are. People who knit or crochet at such a blinding speed that the normal eye cannot keep up with it. Now, I'm not criticizing this, I'm just acknowledging it. I would never criticize another style that's different from mine, just as I would expect someone else not to criticize my style. But that's another subject entirely.
Me, I like to knit and crochet at a more sedate pace. I will never be able to knit or crochet at Olympian-like speed, and I don't want to. Knitting and crocheting is very relaxing to me and I don't think it's very relaxing to be knitting or crocheting at a speed that would make a NASCAR driver envious. But, if you're one of these, and you find it relaxing, then that's great.
As an example. I once looked up entralec (probably didn't spell that right) knitting videos, and while one such video described what to do perfectly, her hands moved so fast that I couldn't see what she was doing. It exhausted me just to watch it.
I think I'll call these types of people the hares. You know, like in the tortoise and the hare story? Me, I'm a tortoise. I'll get to the finish line....eventually. But I don't expect I'll ever keep up with the hares. Frankly, I'd like to sit and watch one knit a sock at that blinding speed. Or crochet one, for that matter.
Me, I like to knit and crochet at a more sedate pace. I will never be able to knit or crochet at Olympian-like speed, and I don't want to. Knitting and crocheting is very relaxing to me and I don't think it's very relaxing to be knitting or crocheting at a speed that would make a NASCAR driver envious. But, if you're one of these, and you find it relaxing, then that's great.
As an example. I once looked up entralec (probably didn't spell that right) knitting videos, and while one such video described what to do perfectly, her hands moved so fast that I couldn't see what she was doing. It exhausted me just to watch it.
I think I'll call these types of people the hares. You know, like in the tortoise and the hare story? Me, I'm a tortoise. I'll get to the finish line....eventually. But I don't expect I'll ever keep up with the hares. Frankly, I'd like to sit and watch one knit a sock at that blinding speed. Or crochet one, for that matter.
Sunday, August 24, 2014
Wearable doilies
Yes, doilies are wearable. If you check older posts then you'll find I've made a wrap from a chair doily pattern.
Now I've found a free pineapple doily pattern from Freepatterns. The Starburst and Pineapple one is perfect to make a capelet from. Just chain a chain big enough to fit over your head and sit on your shoulders, join into a ring and make 180 dc in it and join that. Then you just start from rnd 9 on the pattern and follow it. You'll skip 4 dc between shells on rnd 9 and have 36 shells when you're finished. I've only just started the pineapple bases on mine, so no pics yet, but it's looking really good. It does look a bit untidy after putting the rnd of dc in, but it straightens out pretty quickly on subsequent rnds. I'm using sport/baby yarn and a size G hook.
In other news, I've mastered the Continental style of knitting and even like it now that I can do it effortlessly. I'm still working on the scarves and cowls, but I'm still a notoriously slow finisher, so it could be Christmas before I finish them. Just wanted to let anyone who's reading this know that I'm making progress. There are some pictures up on my Facebook page, but none here yet.
Now I've found a free pineapple doily pattern from Freepatterns. The Starburst and Pineapple one is perfect to make a capelet from. Just chain a chain big enough to fit over your head and sit on your shoulders, join into a ring and make 180 dc in it and join that. Then you just start from rnd 9 on the pattern and follow it. You'll skip 4 dc between shells on rnd 9 and have 36 shells when you're finished. I've only just started the pineapple bases on mine, so no pics yet, but it's looking really good. It does look a bit untidy after putting the rnd of dc in, but it straightens out pretty quickly on subsequent rnds. I'm using sport/baby yarn and a size G hook.
In other news, I've mastered the Continental style of knitting and even like it now that I can do it effortlessly. I'm still working on the scarves and cowls, but I'm still a notoriously slow finisher, so it could be Christmas before I finish them. Just wanted to let anyone who's reading this know that I'm making progress. There are some pictures up on my Facebook page, but none here yet.
Wednesday, July 23, 2014
Another Practice
I found a pattern for the knit Dimple Stitch and I think it will make a fantastic scarf or baby blanket. I'm doing it in a scarf first, practicing my continental knitting. Since this pattern naturally tends to curl I'm putting in a four stitch garter border.
For the scarf, I've cast on 31 stitches to accommodate the pattern and the edge stitches. I've already figured out that if I slip the first stitch of each row, it's much easier to knit the next ones. And since it's a garter border, slipping that stitch won't make much difference.
I just don't know how I'm going to fare when I get to the pattern part, but we'll see. I'm using an off-white yarn, I think it's RHSS.
For the scarf, I've cast on 31 stitches to accommodate the pattern and the edge stitches. I've already figured out that if I slip the first stitch of each row, it's much easier to knit the next ones. And since it's a garter border, slipping that stitch won't make much difference.
I just don't know how I'm going to fare when I get to the pattern part, but we'll see. I'm using an off-white yarn, I think it's RHSS.
Practicing
I did say that scarves are a good way to practice stitches and knitting techniques, so I'm doing just that. I'm working on a mobius scarf in seed (moss) stitch. For those who don't know what this is, a mobius scar is a loop that has a half twist in it. You can make one easily by knitting a scarf and then sewing the two ends together after putting the half-twist in. This is what I am doing this time. You can also make a seamless one by using a long circular needle and using any of a number of methods that you can simply Google. It's best to make a mobius scarf in a reversible stitch (such as ribbing, moss or double moss) because you will see the front and back of it when it's done.
As for seed stitch (our European friends call it moss stitch). It is simply 1x1 ribbing done on an uneven number of stitches. You can do it on an even number of stitches if you remember that on the second row you need to start with a purl stitch instead of a knit stitch. This gives that bumpy texture that resembles seeds scattered over it. Just remember to knit the knit stitches and purl the purl stitches on each row and you'll do fine.
I'm doing this to practice knitting continental style (yarn in left hand). I've knitted English style (yarn in right hand) for over forty years (close to fifty), so this will be a challenge. The biggest challenge will be purling. Knitting is easy continental style, but purling requires a bit more practice. What better practice than to do seed stitch and make a pretty wearable in the process?
I'll let you know how it goes.
Day one:
I cast on 45 sts for my uneven number. This way I can just mindlessly k1, p1 the whole time without trying to remember if I'm on row 1 or row 2 of the pattern.
The first row was a bit difficult, as I predicted. The second row was a bit easier. I'm sure I'll become a bit more proficient as I progress, I've only been trying this style for a few days, so it feels kind of clumsy still.
As for seed stitch (our European friends call it moss stitch). It is simply 1x1 ribbing done on an uneven number of stitches. You can do it on an even number of stitches if you remember that on the second row you need to start with a purl stitch instead of a knit stitch. This gives that bumpy texture that resembles seeds scattered over it. Just remember to knit the knit stitches and purl the purl stitches on each row and you'll do fine.
I'm doing this to practice knitting continental style (yarn in left hand). I've knitted English style (yarn in right hand) for over forty years (close to fifty), so this will be a challenge. The biggest challenge will be purling. Knitting is easy continental style, but purling requires a bit more practice. What better practice than to do seed stitch and make a pretty wearable in the process?
I'll let you know how it goes.
Day one:
I cast on 45 sts for my uneven number. This way I can just mindlessly k1, p1 the whole time without trying to remember if I'm on row 1 or row 2 of the pattern.
The first row was a bit difficult, as I predicted. The second row was a bit easier. I'm sure I'll become a bit more proficient as I progress, I've only been trying this style for a few days, so it feels kind of clumsy still.
Continental vs English
Or Picking vs Throwing.
What is it? It's two different styles of knitting. Picking involves wrapping the yarn in your left hand and 'picking' it through the stitches. There are several ways to do this, just google some youtube videos.
Throwing involves holding the yarn in your right hand and 'throwing' it around the working needle to make the stitch. You can also google youtube videos of this method.
So, which method is right for you? Only you can decide that. If you're a long-time crocheter who has wanted to learn to knit, I'd say try Continental. I learned to knit and crochet at roughly the same time, and the person who taught me to knit used the English, or throwing method, so that's what I did for over forty years. It was just a few days ago that I decided to give Continental a try. Again, actually. I usually gave up on it because purling Continental-style, is harder than knitting. It takes a bit of a different approach to pick a purl stitch, but this time I think I've got it, after a couple days of practicing on a partially-finished scarf someone gave me. Scarves are perfect projects to practice knitting techniques on since they don't require a gauge.
The only thing I had to do was figure out how to do the end pattern rows. I had to look at the front and back, and then I tried a swatch with some more needles and yarn and figured out that it was a two-row repeat of an odd ribbing pattern. It went on the right side like 1x1 rib, but on the back, you would purl across. This gave the rib a different and more decorative look.
Anyway, Continental style knitting lends itself well to doing ribbing, seed (moss) or moss (double moss) very well. The pattern goes much faster, once you master the two basic knit and purl stitches.
I even had a way to compare the two on the scarf. I did the first end pattern English style and am doing the second repeat Continental style. There is a definite gauge difference between the two. The Continental method makes the gauge a bit tighter and neater.
I'd say I would use Continental for a lot of my knitting now, but I would switch to English style for colorwork, unless I figure out how to knit with yarn held in both hands. Which would be quite a feat.
What is it? It's two different styles of knitting. Picking involves wrapping the yarn in your left hand and 'picking' it through the stitches. There are several ways to do this, just google some youtube videos.
Throwing involves holding the yarn in your right hand and 'throwing' it around the working needle to make the stitch. You can also google youtube videos of this method.
So, which method is right for you? Only you can decide that. If you're a long-time crocheter who has wanted to learn to knit, I'd say try Continental. I learned to knit and crochet at roughly the same time, and the person who taught me to knit used the English, or throwing method, so that's what I did for over forty years. It was just a few days ago that I decided to give Continental a try. Again, actually. I usually gave up on it because purling Continental-style, is harder than knitting. It takes a bit of a different approach to pick a purl stitch, but this time I think I've got it, after a couple days of practicing on a partially-finished scarf someone gave me. Scarves are perfect projects to practice knitting techniques on since they don't require a gauge.
The only thing I had to do was figure out how to do the end pattern rows. I had to look at the front and back, and then I tried a swatch with some more needles and yarn and figured out that it was a two-row repeat of an odd ribbing pattern. It went on the right side like 1x1 rib, but on the back, you would purl across. This gave the rib a different and more decorative look.
Anyway, Continental style knitting lends itself well to doing ribbing, seed (moss) or moss (double moss) very well. The pattern goes much faster, once you master the two basic knit and purl stitches.
I even had a way to compare the two on the scarf. I did the first end pattern English style and am doing the second repeat Continental style. There is a definite gauge difference between the two. The Continental method makes the gauge a bit tighter and neater.
I'd say I would use Continental for a lot of my knitting now, but I would switch to English style for colorwork, unless I figure out how to knit with yarn held in both hands. Which would be quite a feat.
Saturday, September 07, 2013
The things we notice
When we're watching a tv show or a movie. That is, it depends on your hobby or interest. Mine happens to be crafting. Specifically, knitting and crocheting, not necessarily in that order.
When you're an avid crafter, whether or not you make a lot of things or just a few things a year, you begin to notice things when you watch tv, and not necessarily anything having to do with the plot.
For instance, one of the tv stations ran Wayne's World yesterday and I couldn't help but notice the afghan on the couch they used during their broadcast. It's made out of large hexagons, each in a different color. I focused on that to the point that I googled images of Wayne's World to find a still of it. Then I tried making one. After several failed attempts, I got something similar by using clusters and chain spaces. I got an eight inch across motif out of some blue.
Now I'm determined to make a similar afghan by rummaging through my yarn and using whatever I find. I know it won't be just like it, but since that's what inspired it, I think I'll call it Wayne's World Inspired Afghan, or WWIA.
Now, onto other things. I knit and crochet both, so when, in an early season one episode of CSI: NY, a lady at a dog show told Mac that she had knitted the afghan in her lap for her dog I immediately said "No way did she knit that." It was a granny square afghan, and you can only get granny squares by crocheting them. The prop person obviously wasn't a knitter or a crocheter or they would have at least acquired a knitted afghan for the lady to brag about. I'm pretty sure most people didn't see that goof, but I did and was very amused by it. A quick look at the ep "Recycling" on Imdb shows that someone else did. I'm glad I'm not the only one who saw it.
Now, every time I watch tv (which isn't often anymore since most stuff is boring these days) I tend to notice when an actor/actress is wearing a handknit/crocheted item, and I will sometimes look up pictures of it (or attempt to), to see if I could possibly duplicate it. I've seen hats, vests, sweaters, scarves, etc.
You know it's bad when you're more interested in props/costumes than you are in the show itself...
When you're an avid crafter, whether or not you make a lot of things or just a few things a year, you begin to notice things when you watch tv, and not necessarily anything having to do with the plot.
For instance, one of the tv stations ran Wayne's World yesterday and I couldn't help but notice the afghan on the couch they used during their broadcast. It's made out of large hexagons, each in a different color. I focused on that to the point that I googled images of Wayne's World to find a still of it. Then I tried making one. After several failed attempts, I got something similar by using clusters and chain spaces. I got an eight inch across motif out of some blue.
Now I'm determined to make a similar afghan by rummaging through my yarn and using whatever I find. I know it won't be just like it, but since that's what inspired it, I think I'll call it Wayne's World Inspired Afghan, or WWIA.
Now, onto other things. I knit and crochet both, so when, in an early season one episode of CSI: NY, a lady at a dog show told Mac that she had knitted the afghan in her lap for her dog I immediately said "No way did she knit that." It was a granny square afghan, and you can only get granny squares by crocheting them. The prop person obviously wasn't a knitter or a crocheter or they would have at least acquired a knitted afghan for the lady to brag about. I'm pretty sure most people didn't see that goof, but I did and was very amused by it. A quick look at the ep "Recycling" on Imdb shows that someone else did. I'm glad I'm not the only one who saw it.
Now, every time I watch tv (which isn't often anymore since most stuff is boring these days) I tend to notice when an actor/actress is wearing a handknit/crocheted item, and I will sometimes look up pictures of it (or attempt to), to see if I could possibly duplicate it. I've seen hats, vests, sweaters, scarves, etc.
You know it's bad when you're more interested in props/costumes than you are in the show itself...
Wednesday, September 04, 2013
Socks
You know, just when you think you've seen it all, along comes something you haven't seen. Or, just when you find a favorite heel method, along comes another method that's just 'that' much better.
What am I speaking of?
Fish Lips Kiss Heel
Funny name for a gorgeous heel. The pattern is only $1, and since I had a couple dollars in my paypal, I bought it today. I haven't tried it yet, naturally, but after reading it and checking the pic tutorial at the end, it looks like this is going to be my new favorite heel. Now all I'll need is to make some cardboard feet.
The only thing that bugged me about short row heels doing them with YOs, is that it left a ridge of sts inside the sock that I could sometimes feel. This method doesn't use any kind of extra stitches and it looks like it would be easy to do once you memorize the method.
Of course, I have been knitting for most of my life, so just about anything would be easy to me once I've done it at least once or twice, but still, even beginner sock knitters should be able to do this. For them, I would recommend the linked videos from the pattern. Or I'll just provide them here.
Sox Therapist
That will take you to her two vid tutorials for the short row method she uses in her sock heels.
Seriously, this pattern is worth it if you make a lot of socks. You can use it on any sock pattern and throw away the heel flap/gussets forever.
Then people will start asking you where you bought your socks at ;)
Seriously, I would be flattered if someone asked me that.
What am I speaking of?
Fish Lips Kiss Heel
Funny name for a gorgeous heel. The pattern is only $1, and since I had a couple dollars in my paypal, I bought it today. I haven't tried it yet, naturally, but after reading it and checking the pic tutorial at the end, it looks like this is going to be my new favorite heel. Now all I'll need is to make some cardboard feet.
The only thing that bugged me about short row heels doing them with YOs, is that it left a ridge of sts inside the sock that I could sometimes feel. This method doesn't use any kind of extra stitches and it looks like it would be easy to do once you memorize the method.
Of course, I have been knitting for most of my life, so just about anything would be easy to me once I've done it at least once or twice, but still, even beginner sock knitters should be able to do this. For them, I would recommend the linked videos from the pattern. Or I'll just provide them here.
Sox Therapist
That will take you to her two vid tutorials for the short row method she uses in her sock heels.
Seriously, this pattern is worth it if you make a lot of socks. You can use it on any sock pattern and throw away the heel flap/gussets forever.
Then people will start asking you where you bought your socks at ;)
Seriously, I would be flattered if someone asked me that.
Subscribe to:
Posts (Atom)