I'm pretty sure I've posted about them before. Basically it's a hooded scarf-SCarfhOODIE. I've been meaning to make one for the longest time, and now I have. You basically work the hoodie part first and then attach the scarf. I'll attempt to explain how I did mine. I didn't use a pattern, but I did look up several to research the basic construction and then I began on mine. I might even post the pattern if anyone is interested.
Like my model? Anyway, obviously I ran out of purple yarn before I finished the scarf. I was already aware of that when I chose that color and so I simply finished that last row with the blue and then continued on with it for the edging. It doesn't bother me and it gives the scoodie character. It's very warm and soft too. If we get any more bitterly cold weather I'll even get to try it out before spring.
I call it the Ribby Scoodie, for obvious reasons. Basically I chained 70 (should have chained 71 to get an even number of sts, but oh well) Then I hdc in the 2nd chain and each chain across. Then I chained one to turn all rows (did not count as a stitch) and would hdc in the horizontal strand just under the top of the stitch. This would push the top of the stitch over so I got a line of chains across my piece. After about thirty rows of this I crocheted the hoodie together at the top, only using the inside loops of the last row of hdcs (Also did this from the right side). Fastened off, then I chose another color of yarn and chained 71. Then I hdc across like with the hoodie, then I hdc across the bottom, free loops of the hoodie beginning chain. Then I did a 70-chain hdc beg chain on the other side. Basically this means that you YO, insert hook in the bottom st and pull up a lp. You have three lps on hook. YO and pull through ONE lp. You still have three lps on hook. YO and complete the hdc. Repeat for as many hdc as you need. Then I completed the scarf in the same way as I did the hoodie (you will decide how wide you want your scarf). For edging, I simply sc evenly all the way around (3 sc in corners) and then did V-sts for the final rnd. In corners I would dc, ch 1, dc, ch 1 and dc. I would sk 2 sc between V-sts to keep my work flat. Also, you need to use the tail of the scarf ch to fasten that part of it to the hoodie before you hide it. You'll see what I mean if you try this, so leave yourself a generous end when you begin your scarf.
So, I used WW acrylic yarn. The pink is RHSS and I have no idea what brand the purple is. The blue is also RHSS. The purple is also a bit thicker than the pink/blue, but it was still classed as WW, if I remember from the wrapper it used to have. Same difference if you look at RHSS and Simply Soft. Both are classed as 4 weight, but RHSS is slightly thicker than Simply Soft.
I also used a 7mm hook to crochet it. 7mm is between a K and L hooks, so either of those would work as well. I don't have a gauge, but it's pretty unnecessary. Just make the hoodie and scarf whatever size you want by varying the number of chains.
Showing posts with label crochet. Show all posts
Sunday, January 07, 2018
Friday, November 27, 2015
Neck Pillow
You know, those 'U'-shaped pillows that you use when you're traveling. Coincidentally, they're also called travel pillows. Well, I wanted one to sleep with in my bed. See, I can't sleep lying flat anymore. I broke my arm this past Father's Day and if I try to sleep lying flat on my back, that shoulder and arm will complain. Loudly.
So, my darling, loving husband fixed the mattress by placing old sofa cushions under there to raise it up enough so I don't have to sleep in the recliner anymore. But now I can't get my head comfortable. Then I thought about it and came up with a solution. You guessed it, a neck pillow. Since I like to knit and crochet I started looking for a pattern. There is one at Lion Brand that was close to what I needed, but it was too flat-looking. Others looked like dog bones. I didn't want a dog bone to sleep on. So, like always, I started thinking about how to create what I wanted, and the answer just came to me. Socks!
Toe-up socks start off with a provisional cast-on and then you make short rows to form the toe (Well, some of them do.), just like making a short row heel. Problem solved. So, I grabbed up a long circular needle and began knitting. I made a short row 'toe' and I am now knitting up one side of the pillow like it was a big, bulky sock. When I get to where I like how it looks, I'll make another short row 'heel', then make the back of the pillow, another 'heel', then down the other side, where I'll make another 'toe'. Whatever you want to call them, they're all made the same and I believe I'll have a neat little neck/travel pillow when I'm done. Oh, and for convenience sake, it's easier to stuff it as I go with all of those angles that will be in it. And since its construction is identical to socks, I'm calling it the Socks Neck Pillow.
Oh, and I'm translating it to crochet too. Good thing I'm making two of them, the husband will probably want one anyway.
The only way I'll probably finish them both is to work on them alternately. It'll also help alleviate the boredom or working in one stitch all the time. Maybe I'll make up some more decorative ones with different stitches later, I need these fast so sc and knitting around is the fastest.
So, my darling, loving husband fixed the mattress by placing old sofa cushions under there to raise it up enough so I don't have to sleep in the recliner anymore. But now I can't get my head comfortable. Then I thought about it and came up with a solution. You guessed it, a neck pillow. Since I like to knit and crochet I started looking for a pattern. There is one at Lion Brand that was close to what I needed, but it was too flat-looking. Others looked like dog bones. I didn't want a dog bone to sleep on. So, like always, I started thinking about how to create what I wanted, and the answer just came to me. Socks!
Toe-up socks start off with a provisional cast-on and then you make short rows to form the toe (Well, some of them do.), just like making a short row heel. Problem solved. So, I grabbed up a long circular needle and began knitting. I made a short row 'toe' and I am now knitting up one side of the pillow like it was a big, bulky sock. When I get to where I like how it looks, I'll make another short row 'heel', then make the back of the pillow, another 'heel', then down the other side, where I'll make another 'toe'. Whatever you want to call them, they're all made the same and I believe I'll have a neat little neck/travel pillow when I'm done. Oh, and for convenience sake, it's easier to stuff it as I go with all of those angles that will be in it. And since its construction is identical to socks, I'm calling it the Socks Neck Pillow.
Oh, and I'm translating it to crochet too. Good thing I'm making two of them, the husband will probably want one anyway.
The only way I'll probably finish them both is to work on them alternately. It'll also help alleviate the boredom or working in one stitch all the time. Maybe I'll make up some more decorative ones with different stitches later, I need these fast so sc and knitting around is the fastest.
Labels:
circular knitting,
crochet,
musings,
neck pillow,
pattern,
short rows,
socks
Saturday, September 27, 2014
Speed Knitting/Crocheting
This I am not. But there are some out there who are. People who knit or crochet at such a blinding speed that the normal eye cannot keep up with it. Now, I'm not criticizing this, I'm just acknowledging it. I would never criticize another style that's different from mine, just as I would expect someone else not to criticize my style. But that's another subject entirely.
Me, I like to knit and crochet at a more sedate pace. I will never be able to knit or crochet at Olympian-like speed, and I don't want to. Knitting and crocheting is very relaxing to me and I don't think it's very relaxing to be knitting or crocheting at a speed that would make a NASCAR driver envious. But, if you're one of these, and you find it relaxing, then that's great.
As an example. I once looked up entralec (probably didn't spell that right) knitting videos, and while one such video described what to do perfectly, her hands moved so fast that I couldn't see what she was doing. It exhausted me just to watch it.
I think I'll call these types of people the hares. You know, like in the tortoise and the hare story? Me, I'm a tortoise. I'll get to the finish line....eventually. But I don't expect I'll ever keep up with the hares. Frankly, I'd like to sit and watch one knit a sock at that blinding speed. Or crochet one, for that matter.
Me, I like to knit and crochet at a more sedate pace. I will never be able to knit or crochet at Olympian-like speed, and I don't want to. Knitting and crocheting is very relaxing to me and I don't think it's very relaxing to be knitting or crocheting at a speed that would make a NASCAR driver envious. But, if you're one of these, and you find it relaxing, then that's great.
As an example. I once looked up entralec (probably didn't spell that right) knitting videos, and while one such video described what to do perfectly, her hands moved so fast that I couldn't see what she was doing. It exhausted me just to watch it.
I think I'll call these types of people the hares. You know, like in the tortoise and the hare story? Me, I'm a tortoise. I'll get to the finish line....eventually. But I don't expect I'll ever keep up with the hares. Frankly, I'd like to sit and watch one knit a sock at that blinding speed. Or crochet one, for that matter.
Sunday, August 24, 2014
Wearable doilies
Yes, doilies are wearable. If you check older posts then you'll find I've made a wrap from a chair doily pattern.
Now I've found a free pineapple doily pattern from Freepatterns. The Starburst and Pineapple one is perfect to make a capelet from. Just chain a chain big enough to fit over your head and sit on your shoulders, join into a ring and make 180 dc in it and join that. Then you just start from rnd 9 on the pattern and follow it. You'll skip 4 dc between shells on rnd 9 and have 36 shells when you're finished. I've only just started the pineapple bases on mine, so no pics yet, but it's looking really good. It does look a bit untidy after putting the rnd of dc in, but it straightens out pretty quickly on subsequent rnds. I'm using sport/baby yarn and a size G hook.
In other news, I've mastered the Continental style of knitting and even like it now that I can do it effortlessly. I'm still working on the scarves and cowls, but I'm still a notoriously slow finisher, so it could be Christmas before I finish them. Just wanted to let anyone who's reading this know that I'm making progress. There are some pictures up on my Facebook page, but none here yet.
Now I've found a free pineapple doily pattern from Freepatterns. The Starburst and Pineapple one is perfect to make a capelet from. Just chain a chain big enough to fit over your head and sit on your shoulders, join into a ring and make 180 dc in it and join that. Then you just start from rnd 9 on the pattern and follow it. You'll skip 4 dc between shells on rnd 9 and have 36 shells when you're finished. I've only just started the pineapple bases on mine, so no pics yet, but it's looking really good. It does look a bit untidy after putting the rnd of dc in, but it straightens out pretty quickly on subsequent rnds. I'm using sport/baby yarn and a size G hook.
In other news, I've mastered the Continental style of knitting and even like it now that I can do it effortlessly. I'm still working on the scarves and cowls, but I'm still a notoriously slow finisher, so it could be Christmas before I finish them. Just wanted to let anyone who's reading this know that I'm making progress. There are some pictures up on my Facebook page, but none here yet.
Wednesday, December 07, 2011
Gloves
I love crocheting fingerless mitts, as you can see from some of my previous posts. They allow me to keep my hands warm while leaving my fingers free to type, knit or crochet.
However, my husband does not like them. He told me he wants gloves, with fingers in them. I've scoured Crochetpatterncentral and Knittingpatterncentral and while I've saved some patterns to try out later, I wanted to do him some gloves *now*, not have to go to the store and buy yarn and needles (likely I'd have to order the needles anyway).
So I've picked some yellow Simply Soft from my stash and crochet hooks and I am working on something. I'm writing it down as I go and will put it up on my pattern blog as soon as I'm finished. A word of warning-they will not be easy for a beginner, most likely you'll have to be an intermediate crocheter or better to make them.
However, my husband does not like them. He told me he wants gloves, with fingers in them. I've scoured Crochetpatterncentral and Knittingpatterncentral and while I've saved some patterns to try out later, I wanted to do him some gloves *now*, not have to go to the store and buy yarn and needles (likely I'd have to order the needles anyway).
So I've picked some yellow Simply Soft from my stash and crochet hooks and I am working on something. I'm writing it down as I go and will put it up on my pattern blog as soon as I'm finished. A word of warning-they will not be easy for a beginner, most likely you'll have to be an intermediate crocheter or better to make them.
Sunday, November 20, 2011
Candy Corn Hat
It's a really cute hat. The pattern can be found here. It would only take a few hours to complete one.
I did make a couple changes. To get gauge I had to use a size H hook and I didn't do any decreases in the last two rnds. Also, when I changed colors, I ended off the old color and attached the new color in a different spot, usually between where I ended off and the next inc. It's about the size of a child's head and I'll get a picture up once I get one of my grandchildren to model it for me.
I'm going to try making one in an adult size as well, so I'm either going to go a couple sizes bigger on the hook (J), or add in another inc in each rnd. I'll let you know.
I did make a couple changes. To get gauge I had to use a size H hook and I didn't do any decreases in the last two rnds. Also, when I changed colors, I ended off the old color and attached the new color in a different spot, usually between where I ended off and the next inc. It's about the size of a child's head and I'll get a picture up once I get one of my grandchildren to model it for me.
I'm going to try making one in an adult size as well, so I'm either going to go a couple sizes bigger on the hook (J), or add in another inc in each rnd. I'll let you know.
Wednesday, February 09, 2011
Calculating a single crochet ripple starting chain
It's actually quite easy, now that I've thought about it. If you don't have a pattern in front of you and you want to crochet a single crochet ripple, then simply figure out how many stitches you want on each side of the peak, add one for the peak and two for the skipped chains at the bottom. This is your multiple. Then crochet this multiple until you have as many peaks as desired, then add three more. This formula will work for any size sc ripple, no matter how many sts you want in each peak.
For instance. Say you want 7 sc along each side. Okay, that's 14. Now you will add 3 more (one for your peak and the two you will skip at the bottom). So that's 14 + 3 = 17. 17 will be your multiple. Now say you want 10 peaks for a wrap. Your starting chain will be 17 x 10 = 170. Now you'll want to add 3 more, bringing your total to 173. So your pattern will read multiple of 17 + 3, meaning you will chain your multiple (17) as many times as you need, then add three more chains at the end.
To crochet this, you will sc in 2nd ch from hook, sk next ch, *sc in next 7 chs, 3 sc in next ch, sc in next 7 chs, sk 2 chs. Repeat from * across to the last 2 chs, sk 1 ch, sc in last ch.
Row 2 and all other rows: Ch 1, turn. Working in the BLO, sc in first sc, sk next sc, *sc in next 7 sc, 3 sc in next sc, sc in next 7 sc, sk 2 sc. Repeat from * across to the last 2 sc, sk next sc, sc in last sc.
That's all there is to it. Use a little math and pre-planning and you can make anything from a scarf to a wrap to an afghan.
Here's some starting multiples for you:
4 sc on sides: Multiple 11 + 3
5 sc on sides: Multiple 13 + 3
6 sc on sides: Multiple 15 + 3
7 sc on sides: Multiple 17 + 3
8 sc on sides: Multiple 19 + 3
9 sc on sides: Multiple 21 + 3
10 sc on sides: Multiple 23 + 3
See the pattern?
For instance. Say you want 7 sc along each side. Okay, that's 14. Now you will add 3 more (one for your peak and the two you will skip at the bottom). So that's 14 + 3 = 17. 17 will be your multiple. Now say you want 10 peaks for a wrap. Your starting chain will be 17 x 10 = 170. Now you'll want to add 3 more, bringing your total to 173. So your pattern will read multiple of 17 + 3, meaning you will chain your multiple (17) as many times as you need, then add three more chains at the end.
To crochet this, you will sc in 2nd ch from hook, sk next ch, *sc in next 7 chs, 3 sc in next ch, sc in next 7 chs, sk 2 chs. Repeat from * across to the last 2 chs, sk 1 ch, sc in last ch.
Row 2 and all other rows: Ch 1, turn. Working in the BLO, sc in first sc, sk next sc, *sc in next 7 sc, 3 sc in next sc, sc in next 7 sc, sk 2 sc. Repeat from * across to the last 2 sc, sk next sc, sc in last sc.
That's all there is to it. Use a little math and pre-planning and you can make anything from a scarf to a wrap to an afghan.
Here's some starting multiples for you:
4 sc on sides: Multiple 11 + 3
5 sc on sides: Multiple 13 + 3
6 sc on sides: Multiple 15 + 3
7 sc on sides: Multiple 17 + 3
8 sc on sides: Multiple 19 + 3
9 sc on sides: Multiple 21 + 3
10 sc on sides: Multiple 23 + 3
See the pattern?
Thursday, July 09, 2009
Crochet Ribbing
I'm sure 99.9% of crocheters know about the sc ribbing-work back and forth in sc, working in the BLO of each stitch. This does make for a stretchy piece of fabric, but sometimes it doesn't seem to be stretchy enough, or it loses its stretch.
I was reading online somewhere (I'm sorry, I can't remember where, or what pattern) and the person was using a SS (yes, slip stitch) ribbing. I thought to myself, "How ingenious". It's basically worked the same as the sc ribbing, only you use ss, still only crocheting in the BLO. This ribbing-although it's more tedious-is far superior to the sc ribbing, IMO. It's very stretchy, looks almost exactly like the k1, p1 ribbing of knitting. The only thing you need to look out for is accidentally not crocheting all the sts, and to keep your tension on the loose side. If you tighten the sts too much, it will be very hard to do the next row-believe me, I've had to rip back when I wasn't consciously trying to keep my tension a bit looser than normal. And it really isn't too tedious if you keep your tension slack, it goes fairly fast once you get going.
Anyway, I thought I'd share this information to any crocheter out there who would like to try this for sweater, sock, mitten or fingerless glove pattern-it really is soft and stretchy.
Edit: I found it-it was a free pattern for crochet socks that I found and saved.
This is a pdf file, so you'll need either the Adobe reader, or some equivalent to be able to read it.
I was reading online somewhere (I'm sorry, I can't remember where, or what pattern) and the person was using a SS (yes, slip stitch) ribbing. I thought to myself, "How ingenious". It's basically worked the same as the sc ribbing, only you use ss, still only crocheting in the BLO. This ribbing-although it's more tedious-is far superior to the sc ribbing, IMO. It's very stretchy, looks almost exactly like the k1, p1 ribbing of knitting. The only thing you need to look out for is accidentally not crocheting all the sts, and to keep your tension on the loose side. If you tighten the sts too much, it will be very hard to do the next row-believe me, I've had to rip back when I wasn't consciously trying to keep my tension a bit looser than normal. And it really isn't too tedious if you keep your tension slack, it goes fairly fast once you get going.
Anyway, I thought I'd share this information to any crocheter out there who would like to try this for sweater, sock, mitten or fingerless glove pattern-it really is soft and stretchy.
Edit: I found it-it was a free pattern for crochet socks that I found and saved.
This is a pdf file, so you'll need either the Adobe reader, or some equivalent to be able to read it.
Wednesday, July 08, 2009
'Nother Capelet
Here's a not-so-good picture, it doesn't show the colors well at all:

It's from the American School of Needleworks book titled Crocheted Collars by Mary Thomas and the pattern is Pretty Pineapples. Book number 1047.
Instead of thread and steel hook, I used Bernat Soft Baby yarn-one blue and one green held together-and a size J hook. I repeated the pattern six times and it just fits around my neck and the capelet just covers my chest.. I also only ch-5 for the button loop and made a button with a size F hook and the blue yarn.
Hope you like it.

It's from the American School of Needleworks book titled Crocheted Collars by Mary Thomas and the pattern is Pretty Pineapples. Book number 1047.
Instead of thread and steel hook, I used Bernat Soft Baby yarn-one blue and one green held together-and a size J hook. I repeated the pattern six times and it just fits around my neck and the capelet just covers my chest.. I also only ch-5 for the button loop and made a button with a size F hook and the blue yarn.
Hope you like it.
Tuesday, June 23, 2009
Capelet
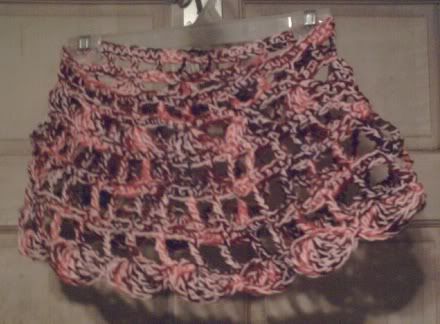
I got the picture of my finished capelet. I didn't have anyone to model it so it's hanging by the door. I hope you like it.

I made it using two colors of Red Heart Super Saver yarn. Since they were partial skeins, and didn't have wrappers, I'm not sure what the exact colors are. One is pink, the other varigated-fiesta, I think, since it has the festive colors of Mexico in it.
Anyway, the pattern can be found here. I hope you enjoy making it, it only takes a few hours. And if you wash and dry it afterwards if you use RHSS yarn, it will come out soft and fluffy, especially if you use fabric softener. I haven't washed mine yet, so it's still a bit stiff and doesn't drape right, but I am going to wash it before I wear it.
I made it using two colors of Red Heart Super Saver yarn. Since they were partial skeins, and didn't have wrappers, I'm not sure what the exact colors are. One is pink, the other varigated-fiesta, I think, since it has the festive colors of Mexico in it.
Anyway, the pattern can be found here. I hope you enjoy making it, it only takes a few hours. And if you wash and dry it afterwards if you use RHSS yarn, it will come out soft and fluffy, especially if you use fabric softener. I haven't washed mine yet, so it's still a bit stiff and doesn't drape right, but I am going to wash it before I wear it.
Monday, June 22, 2009
Finished
I figured out how to get the capelet a bit smaller and still use an N hook. Use smaller stitches. I've also changed the pattern up enough that I'm going to post it on my pattern blog in the morning when I can take a picture of the capelet I just finished.
Using the slightly smaller stitches at the beginning brought the neck in so it fits great and doesn't stretch out so it slides off one shoulder. I hope you guys like it as much as I do. I'll add a picture tomorrow, it's bedtime for me right now, I just thought I'd put this up before I head off to bed, I just started my monthly this morning and I feel really icky right now.
Pattern
In this post I wrote about copying a capelet from a picture of one for sale. I had written down how I did it in notepad, but since have lost it. At least I still have the one I made and can extrapolate from that.
Actually, I'm going to change it up some and probably use a bit smaller hook since the original one does go off the shoulder some, and I don't want that. I'm also going to add some rounds of sc between the other rounds to make it a bit longer and give it a bit more body. I might even put it up in my patterns blog if it turns out all right. It's really very simple, and only 6 rounds as done now, so you could make one up in no time. I really want to make some in some different colors to go with different dresses that I wear to church since they usually keep it quite cool in there and my shoulders get kind of chilly during services.
Anyway, stay tuned, cause it might be awhile-I want to make one and take a picture before I put the pattern up and I have a few things I want to finish up first, as shown by my progress bars over to the right.
Just FYI, the original is a pattern for sale, so I'm going to work on mine to make it significantly different enough to post and still be a nice, airy capelet.
Actually, I'm going to change it up some and probably use a bit smaller hook since the original one does go off the shoulder some, and I don't want that. I'm also going to add some rounds of sc between the other rounds to make it a bit longer and give it a bit more body. I might even put it up in my patterns blog if it turns out all right. It's really very simple, and only 6 rounds as done now, so you could make one up in no time. I really want to make some in some different colors to go with different dresses that I wear to church since they usually keep it quite cool in there and my shoulders get kind of chilly during services.
Anyway, stay tuned, cause it might be awhile-I want to make one and take a picture before I put the pattern up and I have a few things I want to finish up first, as shown by my progress bars over to the right.
Just FYI, the original is a pattern for sale, so I'm going to work on mine to make it significantly different enough to post and still be a nice, airy capelet.
Thursday, December 04, 2008
Several projects on the go
I'm working on a couple pairs of socks-one on dpns and one using Magic Loop. I really should have a circ longer than 16", but since it's a sock, I think I'll manage since I don't have the money to go buy a circ.
I'm also working on a couple of cowls. they'll double as hoods as well. a lot of people also call them wimples, but I like cowl better. I'm using a generic-type one I found on Knitting Pattern Central. Just go to the scarves, and the *Neckwarmer/Wimple. It is in PDF format, so you have to have Adobe Acrobat, or another PDF reader to see it. I doubt I make the increases for the shoulder, I'll see how it fits when I get down there. I'm using some discontinued Bernat Frenzy Yarn I've been trying to find a use for, and a 24" #10-1/2 circ. I CO 100 sts and am just doing st st. I like the way the hood rolled back with the first few rows, and I hope I can find a couple more balls of it stashed away somewhere since I won't be able to purchase any more. If not, I'll probably find something else to use with it.
The next one is going to be one I'm making up-I'll call it Twisted Rib, since that's what I'm doing-twisting the ribs in the 2x1 rib pattern every four rnds. since I'm using RHSS and a 24" #9 circ, I CO 141, and it will still fit pretty snug. I'm liking it already-the twisted ribs give it a really interesting texture.
Lastly, I'm making Dot's Double Crossed Hat. However-working with three strands of WW cotton yarn with a K hook is a bit daunting-and I don't have that much cotton yarn anyway-so I'm using two strands of WW acrylic and an I hook. Yes, I'm having to adjust the pattern a bit, but it's one that seems to be pretty adjustable, so I've added one more inc rnd before starting the crossed sts, and I'm going to add one more rnd of crossed sts before working on the brim. I'll let you know how it turns out. I'm using a bright blue RHSS and a burnt orange acrylic that's unlabeled, so I'm not sure if it's also RH or not-but the two look really nice together. Yes, that means I'm working with a dozen more sts than the pattern calls for, but I think it would hurt my hands even more to be working with three strands of cotton held together and using a K hook.
Edit: When I got to the brim/band, I had to figure some math, since I had quite a few more sts than her 72 (I worked it out so I had 99sts), and came up with 25 sl sts on each side of the brim, 7 sc on each side of the hdcs and 25 hdcs-that seemed to work out pretty right, and it fits my large head pretty well, too.
PS: I almost forgot, I'm doing the Magic Scarf from Crazy Aunt Purl, only I'm using some RH Plush in taupe and #10-1/2 straight needles. It isn't going to be a scarf though-it's going to be a wrap-I CO 60 sts and each section is 10 sts x 10 rows. It's still going pretty fast and is going to be really soft and plushy.
Anyway, back to crocheting-if my achey hands will let me.
I'm also working on a couple of cowls. they'll double as hoods as well. a lot of people also call them wimples, but I like cowl better. I'm using a generic-type one I found on Knitting Pattern Central. Just go to the scarves, and the *Neckwarmer/Wimple. It is in PDF format, so you have to have Adobe Acrobat, or another PDF reader to see it. I doubt I make the increases for the shoulder, I'll see how it fits when I get down there. I'm using some discontinued Bernat Frenzy Yarn I've been trying to find a use for, and a 24" #10-1/2 circ. I CO 100 sts and am just doing st st. I like the way the hood rolled back with the first few rows, and I hope I can find a couple more balls of it stashed away somewhere since I won't be able to purchase any more. If not, I'll probably find something else to use with it.
The next one is going to be one I'm making up-I'll call it Twisted Rib, since that's what I'm doing-twisting the ribs in the 2x1 rib pattern every four rnds. since I'm using RHSS and a 24" #9 circ, I CO 141, and it will still fit pretty snug. I'm liking it already-the twisted ribs give it a really interesting texture.
Lastly, I'm making Dot's Double Crossed Hat. However-working with three strands of WW cotton yarn with a K hook is a bit daunting-and I don't have that much cotton yarn anyway-so I'm using two strands of WW acrylic and an I hook. Yes, I'm having to adjust the pattern a bit, but it's one that seems to be pretty adjustable, so I've added one more inc rnd before starting the crossed sts, and I'm going to add one more rnd of crossed sts before working on the brim. I'll let you know how it turns out. I'm using a bright blue RHSS and a burnt orange acrylic that's unlabeled, so I'm not sure if it's also RH or not-but the two look really nice together. Yes, that means I'm working with a dozen more sts than the pattern calls for, but I think it would hurt my hands even more to be working with three strands of cotton held together and using a K hook.
Edit: When I got to the brim/band, I had to figure some math, since I had quite a few more sts than her 72 (I worked it out so I had 99sts), and came up with 25 sl sts on each side of the brim, 7 sc on each side of the hdcs and 25 hdcs-that seemed to work out pretty right, and it fits my large head pretty well, too.
PS: I almost forgot, I'm doing the Magic Scarf from Crazy Aunt Purl, only I'm using some RH Plush in taupe and #10-1/2 straight needles. It isn't going to be a scarf though-it's going to be a wrap-I CO 60 sts and each section is 10 sts x 10 rows. It's still going pretty fast and is going to be really soft and plushy.
Anyway, back to crocheting-if my achey hands will let me.
Friday, November 09, 2007
Drops slippers
Drops Crochet Slippers
I'm doing these, and they're working up pretty quickly, even though I'm using RH Bright and Lofty in Beaches color. I'm also using a size M hook and making the middle size. This pattern is only in British crochet terms, so keep that in mind if you do it. Also, you have to have another pattern to get the bootie part-they give you the number, but I have the link for it, it's the second one above.
I would not recommend RH Bright and Lofty, Light and Lofty or LB Homespun for these, if you are a beginning crocheter- the stitches are very hard to see. If you don't use their recommended Eskimo yarn, you might want to try Bernat Softee Chunky, or some other similar weight yarn.
I really like the color, I haven't done the top of the bootie yet, and I'm debating whether or not to do it, cause I like it as is. I may not have enough in the one skein of RH I have and don't want to buy more just to do the tops-we'll see.
When I get my hands on a camera, I'll post a pic, I'm still working on the heel of bootie #2.
Drops Crochet Slippers
I'm doing these, and they're working up pretty quickly, even though I'm using RH Bright and Lofty in Beaches color. I'm also using a size M hook and making the middle size. This pattern is only in British crochet terms, so keep that in mind if you do it. Also, you have to have another pattern to get the bootie part-they give you the number, but I have the link for it, it's the second one above.
I would not recommend RH Bright and Lofty, Light and Lofty or LB Homespun for these, if you are a beginning crocheter- the stitches are very hard to see. If you don't use their recommended Eskimo yarn, you might want to try Bernat Softee Chunky, or some other similar weight yarn.
I really like the color, I haven't done the top of the bootie yet, and I'm debating whether or not to do it, cause I like it as is. I may not have enough in the one skein of RH I have and don't want to buy more just to do the tops-we'll see.
When I get my hands on a camera, I'll post a pic, I'm still working on the heel of bootie #2.
Friday, December 01, 2006
Trying something
http://www.crochetkim.com/patterns/bookmark.html
I made the angel part with some Lion Wool and an H hook. I stopped at the point where it said to stop for a pin. Now I'm running it through the wash to see how it felts. It'll be my first felted object, though a pretty small one. It only takes a couple of minutes to make-5 at most, I'd say.
I wanted to try it and see how small it'll get, I want to make a felted pin. If it works I might make some more for some of the ladies at church to wear when we do our Christmas Cantata in a couple of weeks. I know I could make them from thread in about the same amount of time and if it doesn't turn out like I hoped I might still do that but a felted one would be more-wintry-I guess you could say, since we wear a lot of wool in winter.
I'll keep you all posted, it's in the wash right now.
I made the angel part with some Lion Wool and an H hook. I stopped at the point where it said to stop for a pin. Now I'm running it through the wash to see how it felts. It'll be my first felted object, though a pretty small one. It only takes a couple of minutes to make-5 at most, I'd say.
I wanted to try it and see how small it'll get, I want to make a felted pin. If it works I might make some more for some of the ladies at church to wear when we do our Christmas Cantata in a couple of weeks. I know I could make them from thread in about the same amount of time and if it doesn't turn out like I hoped I might still do that but a felted one would be more-wintry-I guess you could say, since we wear a lot of wool in winter.
I'll keep you all posted, it's in the wash right now.
Subscribe to:
Posts (Atom)